DIY Bedside Tables: My Journey to Custom Bedroom Storage

Ever thought store-bought furniture doesn't fit your space or style? Making DIY bedside tables is more than a weekend task. It's a way to make your bedroom a special place that shows your creativity and meets your needs.
I started making DIY bedside tables to match my home. Like many Aussies, I got sick of furniture that looked the same everywhere. I wanted something unique—a piece that tells my story and solves storage problems.
DIY bedside tables are not just useful. They let you create something meaningful, save money, and show off your design skills. This journey is about making a space that's truly yours.
Key Takeaways
- DIY bedside tables offer personalised storage solutions
- Custom furniture can be cost-effective
- No specialised skills required to start your project
- Personalisation is key to successful DIY furniture
- Every DIY project is a learning experience
Why I Decided to Build My Own Bedside Tables
I started making DIY nightstands after a tough time shopping. I looked everywhere in Sydney but couldn't find the right bedside tables. They were too pricey or didn't fit my style.

Building my own nightstands was a creative fix. I wanted something that matched my bedroom's look and offered useful storage.
The Inspiration Behind My Project
Visiting a makers' market in Melbourne changed everything. I saw unique furniture that made me think about making my own. The idea of creating something special for my space was too good to pass up.
- Observed unique furniture designs at local markets
- Wanted a personalized storage solution
- Sought to match my bedroom's specific style
Setting Clear Design Goals
My bedside table plans had to be more than pretty. I set clear goals for my DIY project:
- Maximum storage capacity
- Compact design for small spaces
- Matching existing room decor
- Budget-friendly construction
Budget Considerations and Planning
Understanding costs was key in my DIY journey. I made a detailed budget to track my expenses:
| Expense Category | Estimated Cost |
|---|---|
| Wood Materials | $120 |
| Hardware | $45 |
| Tools | $80 |
| Total Project Cost | $245 |
This budget was much lower than buying pre-made tables. They cost between $300 and $800 in stores. My DIY effort saved money and gave me a custom piece.
Essential Tools and Materials for DIY Bedside Tables
Making wooden bedside tables is fun and adds a personal touch to your room. It's important to have the right tools and materials for a successful project.
First, you need a basic toolkit. This will make your project easier and more fun.
Must-Have Tools for Your Project
- Power drill with various drill bits
- Circular saw or handsaw
- Measuring tape
- Wood sander
- Carpenter's square
- Wood glue
- Clamps
- Safety gear (goggles and work gloves)
If you're on a budget, many Australian stores like Bunnings offer tool rentals. This is a cost-effective way to get quality tools.
Essential Materials for Wooden Bedside Tables
| Material | Recommended Type | Estimated Cost |
|---|---|---|
| Timber | Pine or Tasmanian Oak | $50-$100 |
| Screws | Stainless steel wood screws | $10-$15 |
| Finish | Timber varnish or wood stain | $20-$40 |
| Hardware | Drawer handles or knobs | $15-$30 |
For materials, check local timber yards. They have quality wood and can give advice for Australian conditions.
Pro tip: Buy a bit more material than you think you'll need. This helps with mistakes and ensures you have enough for your project.
Choosing the Perfect Wood for Your Nightstands
Choosing the right timber is key for making rustic or industrial bedside tables. The wood you pick will set the look, strength, and feel of your piece.
My woodworking journey showed me Australia's timber is amazing for DIY furniture. Each wood type has special qualities that can change your bedside table's look.
Popular Timber Options in Australia
For rustic bedside tables, consider these top local timbers:
- Tasmanian Oak: Lightweight, versatile, and great for beginners
- Jarrah: Dense, rich red-brown timber perfect for industrial designs
- Blackwood: Has beautiful grain patterns for elegant designs
- River Red Gum: Very durable with stunning natural markings
Understanding Wood Grades and Quality
Wood grading affects your project's look and strength. Choose timber with few knots and even grain for the best look. Lower-grade timber is good for practice, while top grades give a pro finish.
Where to Source Materials Locally
I've found great timber resources across Australia. Local timber yards, sustainable forestry suppliers, and specialty woodworking stores have top-quality materials for your projects.
- Bunnings Warehouse
- Local timber merchants
- Sustainable forestry cooperatives
- Online woodworking suppliers
Spending time picking the right timber is worth it for your DIY project.
My Step-by-Step Design Process
Making modern bedside tables needs careful planning and creativity. My journey started with understanding my bedroom's unique needs. I saw how DIY furniture could change my sleeping area.
I began by sketching rough ideas that mixed function with style. The goal was to make bedside tables that were more than just storage. They had to be pieces that made my room look great.
- Sketch initial design concepts
- Consider room layout and existing furniture
- Measure available space precisely
- Develop multiple design variations
My process included many important steps. I looked at various styles, from simple Scandinavian to strong industrial designs. Making DIY furniture meant I could make something truly my own.
Practical things were key. I wanted the nightstands to have enough storage but also look clean. Drawing many designs helped me get it right, balancing looks and use.
The final design had clean lines, useful drawer space, and fit well with my room. Every choice was made with care, turning simple DIY furniture into a special piece.
Measuring and Planning Your Custom Storage Solutions
Creating the perfect storage bedside tables needs careful planning and precise measurements. My journey showed me that DIY projects start long before the first cut of wood. Accurate measurement is key to any great bedside table design.
When making bedside table plans, I found some key strategies. These help maximize space and make the table very functional. The right approach can turn a simple piece of furniture into a storage powerhouse that meets your needs.
Space Optimization Techniques
- Measure your bedroom space precisely, including distance from walls and nearby furniture
- Consider electrical outlets and light switch locations
- Account for room for drawers to open fully
- Evaluate your storage requirements (books, devices, personal items)
Creating Detailed Blueprints
Making detailed bedside table plans needs more than just rough sketches. I suggest using graph paper or digital design tools. This helps map out your storage bedside tables with precision.
| Measurement Consideration | Recommended Action |
|---|---|
| Height | Match mattress height or slightly lower |
| Width | Ensure minimum 30cm clearance around furniture |
| Depth | Keep between 35-45cm for optimal functionality |
Pro tip: Always create multiple drafts of your bedside table plans. Each version will help refine your design and spot any challenges before you start building.
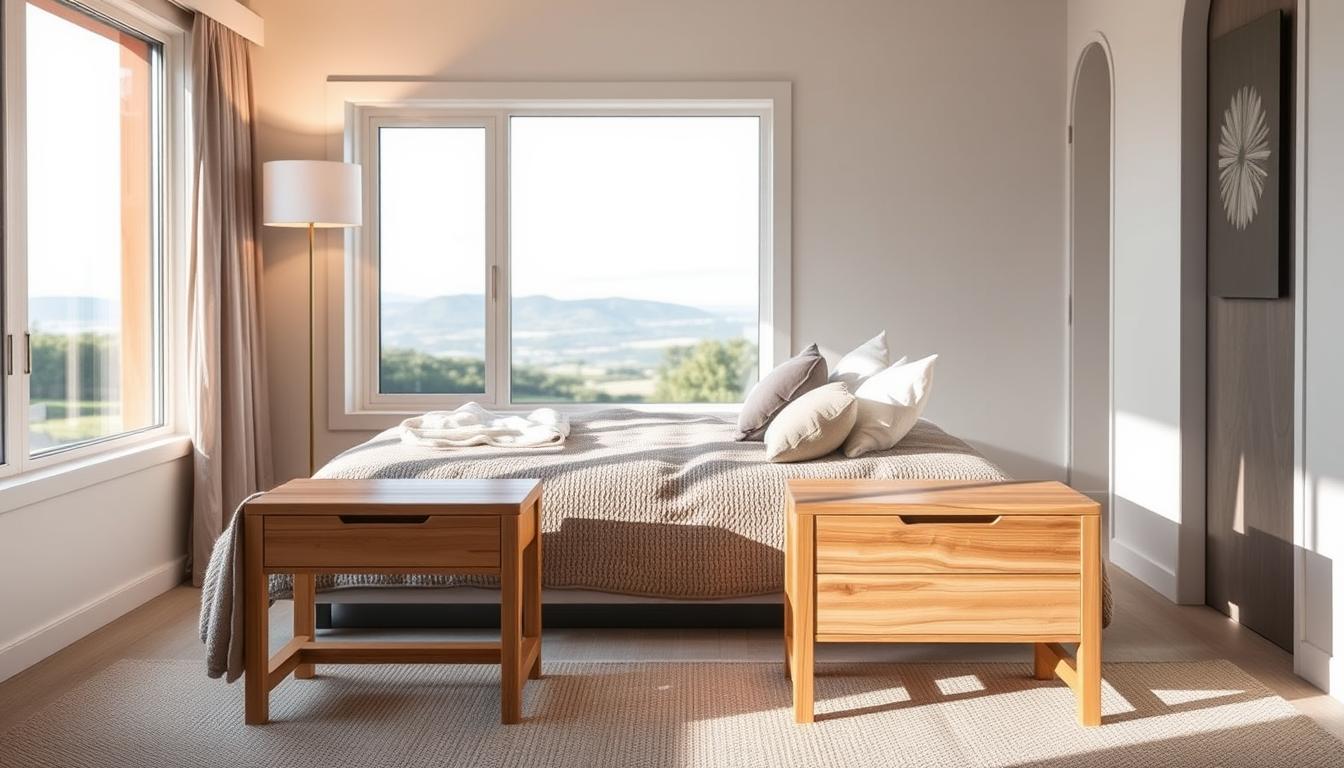
Building Modern Bedside Tables: My Experience
Building DIY bedside tables was a fun challenge. It tested my woodworking skills. I aimed to make modern bedside tables that fit my bedroom's simple style.
I picked high-quality timber for durability and a sleek look. The construction needed precision and patience. I broke it down into steps for a professional finish.
- Measuring and cutting wood with exact measurements
- Sanding surfaces to achieve a smooth finish
- Assembling components with precise wood joints
- Applying a contemporary minimalist design approach
If you're making DIY bedside tables, invest in good tools. Take your time to understand each step. I learned the value of careful planning.
Planning helped me avoid mistakes and get a professional look. The biggest challenge was making them both useful and stylish. I added hidden storage and clean lines.
My design had sleek metal handles and a matte finish. It matched my bedroom's modern style perfectly.
My advice is to start small and be patient. Each project teaches you something new. The joy of making custom furniture that shows your style is unmatched.
Adding Personal Touches: Hardware and Finishes
Turning rustic bedside tables into unique art is about choosing the right hardware and finishes. I learned that these details can make a DIY project go from good to great.
When picking hardware for industrial bedside tables, some things matter a lot. The right handles and knobs are not just useful. They show off your style.
Choosing Exceptional Hardware
- Vintage brass handles for a classic touch
- Leather pulls for rustic bedside tables
- Minimalist metal knobs for industrial bedside tables
- Ceramic options for a softer, more eclectic look
My best advice? Think about the room's design when picking hardware. A creative hardware update can transform something ordinary into something amazing.
Finishing Techniques for Lasting Beauty
Keeping your DIY nightstand safe in Australia's weather is key. Use top-notch wood sealants to fight humidity and sunlight. Water-based polyurethane is great for a strong, protective finish that keeps the wood looking good.
Whether making rustic or industrial bedside tables, the right finish is vital. Try different methods like distressing, waxing, or oil-based treatments to get the look you want.
Incorporating Smart Storage Features
When I started making my DIY nightstands, I saw they were more than just furniture. They were a chance to make smart, personal storage that changes your bedroom.
I aimed to use every bit of space wisely. I found great ways to add hidden spots and flexible storage to keep things tidy. Bedroom storage solutions can be both useful and stylish if you think outside the box.
- Design a pull-out charging station for electronic devices
- Create hidden compartments for valuable or personal items
- Incorporate adjustable shelving for flexible storage
- Add discrete drawer dividers for organized small items
I found that the best storage bedside tables meet your specific needs. For me, that meant making spots for my books, meds, phone charger, and accessories. My DIY nightstands became a perfect fit for my life.
With smart planning, I turned regular furniture into a key part of my bedroom. Now, my space is tidy, clean, and truly mine.
Common Challenges and How I Overcame Them
Starting easy bedside table projects is both fun and tough. My DIY journey showed me that facing setbacks is part of learning. Every woodworking project has its own hurdles, and knowing how to deal with them is key.
When I worked on my DIY bedside table, I hit many common problems. These issues tested my patience and made me think harder. But they also made me better at woodworking.
Troubleshooting Assembly Challenges
Woodworking needs precision and patience. I found a few ways to beat assembly problems:
- Double-check measurements before cutting
- Use clamps to ensure perfect alignment
- Sand edges carefully to create smooth joints
- Test-fit components before final assembly
Learning from Woodworking Mistakes
Making mistakes taught me a lot about DIY furniture. Wood can surprise you, and learning to adapt is part of the fun.
Some important things I learned include:
- Always have extra materials on hand
- Work in a well-ventilated space
- Take your time with each step
- Watch tutorial videos for complex techniques
By being patient and eager to learn, you'll get better at woodworking. These skills will help you with many projects, not just one.
Styling Tips for Your New Bedside Tables
After making my custom wooden bedside tables, I found the joy of styling them. They're not just for storing things. They're also a way to make your bedroom look amazing.
Styling modern bedside tables is all about balance. My tables became the stars of the room by following a few easy rules:
- Create visual height with a mix of objects
- Use different textures to add depth
- Keep functionality at the forefront
- Reflect your personal style
For a simple look, I chose a few key pieces. A sleek lamp, a small succulent, and a special book made my bedside tables look neat. In a more mixed-up room, I tried adding lots of different things. Vintage items, photos, and unique ceramics made my tables tell a story.
Lighting is very important for showing off your bedside tables. I picked soft, warm lamps that make the wood look great and feel cozy. Look for lamps that can be dimmed for both light and mood.
Tip: Change your accessories with the seasons to keep your bedside tables looking new. This keeps things interesting and lets you show off different parts of your style all year.
Maintenance and Care for Long-lasting Results
Protecting your wooden bedside tables is key after making them. Keeping them beautiful and useful for years is the goal.
Looking after your wooden bedside tables needs a plan. It's better to prevent damage than to fix it. Regular care can make your furniture last longer.
Essential Cleaning Techniques
Cleaning your DIY bedroom furniture is easy. Here are my best tips:
- Use a soft, microfibre cloth for daily dusting
- Avoid harsh chemical cleaners that can damage wood surfaces
- Clean spills immediately to prevent staining
- Apply gentle, wood-specific cleaning solutions
Protecting Against Australian Climate Challenges
Australia's weather can harm wooden furniture. Humidity and temperature changes can damage your bedside tables.
- Keep wooden bedside tables away from direct sunlight
- Use wood conditioners suitable for Australian conditions
- Maintain consistent indoor humidity levels
- Apply protective wax or oil seasonally
By following these tips, your DIY wooden bedside tables will stay beautiful. They'll show the love and care you put into making them.
Final Thoughts and Future Projects
Making my own DIY bedside tables was a journey of learning and creativity. It started as a simple project but grew into a passion for woodworking. I found that making easy bedside tables is possible for anyone who's willing to learn and put in some effort.
The skills I've learned have opened up new possibilities for making furniture. I'm planning to make a matching dresser to go with my custom bedside tables. My dream of having a climate-controlled workshop is coming true, and I'm excited for the projects I'll make.
If you're thinking about making your own DIY bedside tables, go for it! The joy of making something with your own hands is unbeatable. Each project makes you more confident and helps you learn new skills. I'm excited to share more of my woodworking adventures and inspire others to be crafty.
Want to see what I'm working on next? Follow me on social media. The DIY journey is more fun when you share it with others who love making things.
FAQ
How much does it cost to build DIY bedside tables?
The cost depends on the materials you pick. I built my bedside tables for $50 to $200. I used affordable timber and tools I already had.
Do I need advanced woodworking skills to make my own bedside tables?
No, you don't need to be a pro. I'm not a carpenter, but I did it. Basic DIY skills, patience, and planning are enough. There are simple designs for beginners.
What are the best timber options for bedside tables in Australia?
Tasmanian Oak, Jarrah, and Blackwood are great choices. Tasmanian Oak is light and versatile. Jarrah has a rich tone. Blackwood has beautiful grain patterns. Think about your room's style and climate when picking timber.
How long does it typically take to build a bedside table?
It's best to set aside a weekend for this project. It might take 6-8 hours over two days. This includes cutting, assembly, and finishing. Planning helps make it smooth and fun.
Can I customise the design to match my bedroom decor?
Yes, you can! DIY projects are all about personalising. I chose timber, hardware, and finishes to match my style. You can easily adapt the design to fit your taste.
What tools will I need for this project?
You'll need a circular saw, drill, measuring tape, sandpaper, wood glue, and clamps. If you're new, many stores offer tool hire. Check out Bunnings for affordable tools.
How do I protect my wooden bedside tables from moisture and wear?
Use a good wood sealant for Australian conditions. Apply thin coats. Use coasters and avoid wet items. Regular maintenance and re-sealing will keep them looking great.
Can I add storage features to my DIY bedside tables?
Yes, you can! I added hidden compartments and adjustable shelves. You can customise with drawers, USB points, or spaces for books and devices. DIY lets you design exactly what you need.